


Why You Should Consider Caching Data With Redis In Your Node.js Applications


What is Caching?
Caching is process of storing data in a cache. A cache is a hardware or software component that stores data so that future requests for that data can be served faster; the data stored in a cache might be the result of an earlier computation or a copy of data stored elsewhere.
In this article, i will be briefly introducing us to Redis, and demonstrating the benefit of using Redis by implementing caching with Redis in a Node.js application.
What is Redis?
Redis is an incredibly fast open source in-memory NoSQL database created in 2009. It has 8 data types with the most popular being - strings, lists, sets, sorted sets and hashes - and also about 160 commands which were created to be high performant.
I guess a better definition will be that from the official Redis site
Redis is an open source (BSD licensed), in-memory data structure store, used as a database, cache and message broker. It supports data structures such as strings, hashes, lists, sets, sorted sets with range queries, bitmaps, hyperloglogs, geospatial indexes with radius queries and streams. Redis has built-in replication, Lua scripting, LRU eviction, transactions and different levels of on-disk persistence, and provides high availability via Redis Sentinel and automatic partitioning with Redis Cluster.
Why Redis?
Some of its use-cases include the following:
- Caching data
- Storing sessions
- Keeping a list of most recent visitors
- Showing lastest items listed on your home page
- Implement expiration on items
- Tracking unique IP to a website
- Displaying leaderboards
Redis is also being used by tons of companies including Twitter, Instagram, GitHub, Stack Overflow, Docker amongst others.
In this tutorial, we will be making a request to the GitHub api to get the publicly available repos a user has and we will be storing them in Redis.
The end result of this is that Redis will help us reduce the number of requests we make to the GitHub api and also dramatically speed up our application in the process.
Installing Redis
To set up Redis on Windows, click on this link and download the zip file.
It contains an executable named redis-server.exe which is used to run Redis on your machine. It also contains redis-cli which is a command line interface which you can use to interact with your redis store.
To setup Redis on Mac using Homebrew, run:
$ brew install redis
Once installed, ensure the redis-server is running and execute the following command in your terminal to get started:
$ redis-cli
Redis runs on port 6379 by default.
Redis Commands
Some example commands to get acquainted with for the purpose of this tutorial:
SET name "John Doe"
To retrieve the name:
GET name
To set value with an expiration:
SETEX name 5 "John Doe"
After 5 seconds, we get a return value of nil.
Getting Started
Generate a package.json file by running the following command:
npm init -y
Install the following dependencies needed for our application:
npm i express node-fetch redis
Install nodemon as a dev dependency:
npm i -D nodemon
Add a start script to run the application with nodemon in the package.json:
"scripts": {
      "start": "nodemon server.js"
}
Now, lets create a server.js file and add the following code to create our express server and redis client:
const express = require('express')
const fetch = require('node-fetch')
const redis = require('redis')
const app = express()

const REDIS_PORT = process.env.REDIS_PORT || 6379
const client = redis.createClient(REDIS_PORT)

/*
 Add all functionality here
*/

const PORT = process.env.PORT || 5000
app.listen(PORT, () => {
    console.log(`App is listening on port ${PORT}`)
})
We then add the code below to create a /repos/:username endpoint which fetches the GitHub repos belonging to the provided user:
// Route to handle requests
app.get('/repos/:username', async (req, res) => {
    try {
        const { username } = req.params
        const response = await fetch(`https://api.github.com/users/${username}/repos`)
        const data = await response.json()
        let repos = data.map(item => item.name)

        res.send(repos)
    } catch (err) {
        console.log(err)
        res.status(500)
    }
})
Now that we have a functioning application, lets make a request to the GitHub api, start your server by running:
npm start
Now open your browser and send a request to get the repos belonging to any user http://localhost:5000/repos/fakorede
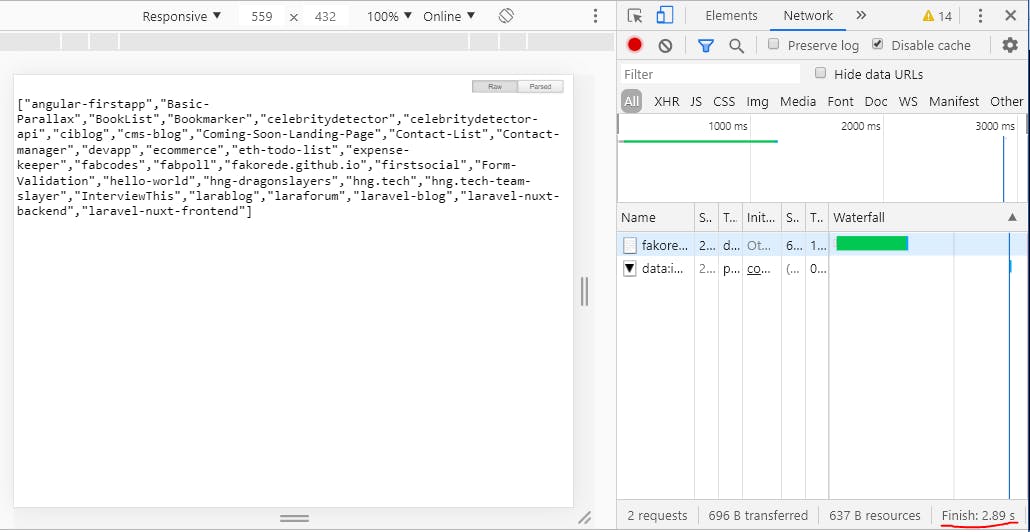
In the above image, we see that it took the GitHub api a few seconds to return the public repos belonging to the provided user, 2.89secs in my case(open the network tab in your browsers' console to see this).
Now, lets implement caching in our application and see how long it takes to retrieve stored data.
Before sending the response, we save the data to Redis by modifying our code as follows:
// Route to handle requests
app.get('/repos/:username', cache, async (req, res) => {
    try {
        const { username } = req.params
        const response = await fetch(`https://api.github.com/users/${username}/repos`)
        const data = await response.json()
        let repos = data.map(item => item.name)

        // save the repos to redis using the username as key and with an expiration of 60secs
        client.setex(username, 60, repos)

        res.send(repos)
    } catch (err) {
        console.log(err)
        res.status(500)
    }
})
Now, lets create a middleware to cache the data we receive from the GitHub api.
In simple terms, a middleware is a function that runs in-between the request and response cycle.
Add the following code just above the route handler:
/* cache middleware */
const cache = (req, res, next) => {
    const { username } = req.params
    client.get(username, (err, data) => {
        if (err) throw err
        if (data !== null) {
            res.send(data)
        } else {
            next()
        }
    })
}
What this does is that it retrieves the data from the Redis store/cache using the provided username as key IF the data is already available in the store.
Now finally, we have to pass the cache middleware as a second parameter to our route handler. Our final piece of code should look like this:
const express = require('express')
const fetch = require('node-fetch')
const redis = require('redis')
const app = express()

const REDIS_PORT = process.env.REDIS_PORT || 6379
const client = redis.createClient(REDIS_PORT)

// cache middleware
const cache = (req, res, next) => {
    const { username } = req.params
    client.get(username, (err, data) => {
        if (err) throw err
        if (data !== null) {
            res.send(data)
        } else {
            next()
        }
    })
}

// Route to handle requests
app.get('/repos/:username', cache, async (req, res) => {
    try {
        const { username } = req.params
        const response = await fetch(`https://api.github.com/users/${username}/repos`)
        const data = await response.json()
        let repos = data.map(item => item.name)

        // save the repos to redis using the username as key and with an expiration
        client.setex(username, 60, repos)

        res.send(repos)
    } catch (err) {
        console.log(err)
        res.status(500)
    }
})

const PORT = process.env.PORT || 5000
app.listen(PORT, () => {
    console.log(`App is listening on port ${PORT}`)
})
Lets run our app again and view the result in our browser
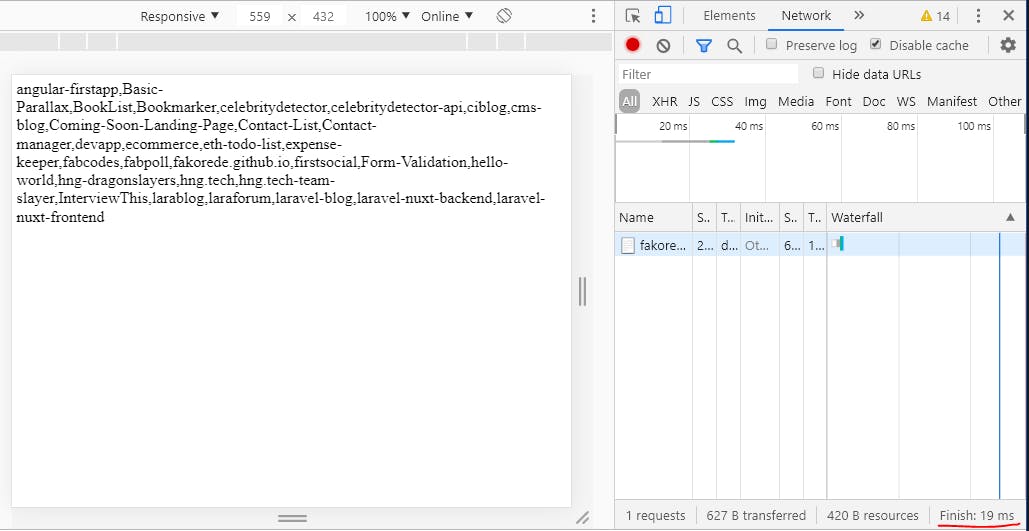
Now, It took Redis just 19milliseconds to return the repos from the cache as highlighted in the image above which is a drastic improvement from the 2.89seconds I had before.
Note The first request will always take longer because it is making that initial request to get the repos for the provided user from the Github api but subsequently, the repos will be fetched from the cache i.e. the Redis store.
Conclusion
In this tutorial, I was able to demonstrate how we can use Redis to improve the performance of our application by caching the data we retrieved from the GitHub Api. By now, I hope i have been able to convince you about the benefits of Redis and why you should use it in your applications asides from the fact that the big companies are using it. 😅
Learn more
The redis documentation is a pretty good place to get more familiar with redis and learn more about redis commands. You can find it here.